

You know how there are some things that you simply never cook because, truth be told, you are too terrified to try them?
For some, it is any sort of baking with yeast that makes their terror rise. For others, it’s the dreaded soufflé that makes their face fall flat. Or maybe things like Bearnaise or Hollandaise sauce that make you want to split and never come back.
Or maybe it’s the frankly impossible-sounding feat of baking ice cream in a meringue cake.
When I was a little girl growing up in the 1970s, probably only seven or eight years old, my mom bought me my first cookbook. It was the “My Learn to Cook Book” and it was a sheer delight. The recipes were all presented by a cartoon cat who would give you useful hints (for example, with the grilled cheese sandwich recipe, he pipes up: “Be careful – hot cheese is really HOT!”), and many of them could be made with minimal adult assistance. I spent many afternoons making the mint creams, or the crispy crackolets (chocolate cornflake clusters).
But the recipe in the book that fascinated me the most, and which I never attempted, was baked Alaska. I mean, how could it be possible to bake ice cream? It seemed to me to be the height of sophistication finesse – some sort of culinary Holy Grail, unknowable and unattainable for the likes of me.

But sometime in 2001, I watched a friend of mine put one together, seemingly with no great effort but with a huge response from the dinner guests. I was intrigued. I made my first baked Alaska for Christmas in 2001 to great critical acclaim from my family (and Nick!). I’d like to be able to say I’ve made it regularly since then but, alas, this would be a lie. It’s not the kind of dessert where you can keep the leftovers, so it’s less than ideal for when it’s only me and Nick at home. And making it for guests would make me feel as if I had to serve it as some sort of ironic, post-modern statement (preferably preceded by avocado Ritz and steak Diane!).
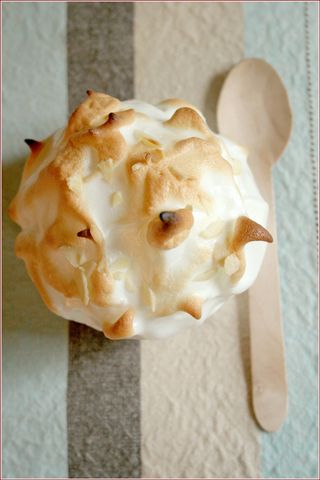
However… given that the theme for this month’s Waiter, There’s Something in My… event was retro classics, how could I resist?? And to get around the problem of leftovers, I made just two individual portions, rather than a party-size cake. Retro perfection!
There is some debate as to the origins of the baked Alaska recipe. One theory is that it was passed on to a Parisian chef by a visitng Chinese delegation in the mid-19th century, although this recipe consisted of ice cream baked inside a pastry crust. The version that became popular in the 1960s and 1970s consists of a layer of sponge cake topped with a layer of fruit or jam and ice cream, all encased in meringue which is baked at a high temperature until the meringue is just set. The name is attributed to the chef at Delmonico’s Restaurant in New York City, who in 1876 named the dish in honour of the newly-acquired territory of Alaska. It attained the height of its popularity in the 1970s, but even today it is a favourite for the final dinner on ocean cruise liners, when a liine of waiters will bring baked Alaskas bristling with sparklers into the dining room to gasps of delight from the passengers.

INDIVIDUAL BAKED ALASKAS WITH COINTREAU & MARMALADE (serves 2)
Ingredients
2 pieces of plain sponge/Madeira cake
good vanilla ice cream
2 Tbsp Cointreau
2 large egg whites at room temperature
3 Tbsp caster sugar
pinch of salt
1/4 tsp cream of tartar
2 tsp marmalade
2 tsp flaked almonds
Method
At least 4 hours before you want to serve your Alaskas, remove the tub of vanilla ice cream from the freezer and allow to defrost until the ice cream is the consistency of thick whipped cream. Fill two small ramekins with the melted ice cream, cover with clingfilm and freeze until the ice cream is hard again.
Pre-heat the oven to 220C.
Cut two circles of sponge cake of the same or slightly larger diameter than the ice cream ramekins. You can either use a round cookie cutter or another identical ramekin to get the size right. The cake circles need to be about an inch thick.
Place the cake circles on oven-proof plates (or, in my case, in loose-bottomed mini quiche tins). Drizzle each circle with a teaspoon of Cointreau and smear 1 tsp of marmalade on top of the cake.
Remove the frozen ramekins of ice cream from the freezer. Dip the base of each into a bowl of hot water, then run a knife along the circumference to loosen the ice cream. Invert above the cake circles – the ice cream should come loose with a gentle tap on the base of the ramekin (and possibly some more persuasion with a knife around the circumference!). Repeat with the second ice cream, then return the ice cream and cake to the freezer while you prepare the meringue.
Whisk the egg whites (or use an electric mixer) until stiff, then add the salt, cream of tartar and the sugar (gradually!). Continue to whisk until you have a thick, glossy mixture than will hold stiff peaks. NB – this is very important, otherwise you will have your meringue sliding off the ice cream rather than insulating it!
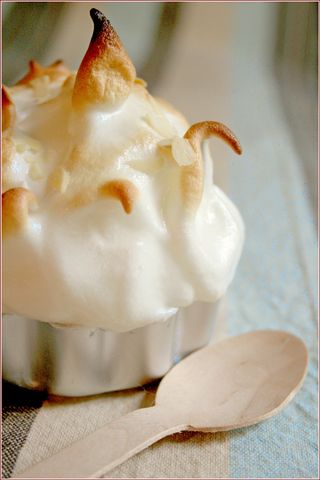
Remove the ice cream and cake from the freezer and pile the meringue mix on the top and sides of the cake and ice cream. Make sure that the cake and ice cream are completely sealed by the meringue and that there are no gaps anywhere, especially around the base.
Sprinkle the flaked almonds on top of the meringue and place in the pre-heated oven for about 6 minutes. NB – watch them carefully as all you really need is for the meringue to set and brown slightly. If you leave them in for too long, the meringue will burn on top and the ice cream will melt!
Remove when done and serve immediately.